Hybrid k3s · Part 2
Hybrid k3s #2: Welcoming the sleeping iMac as a teammate (4 Lima VM agents)
0. About this series
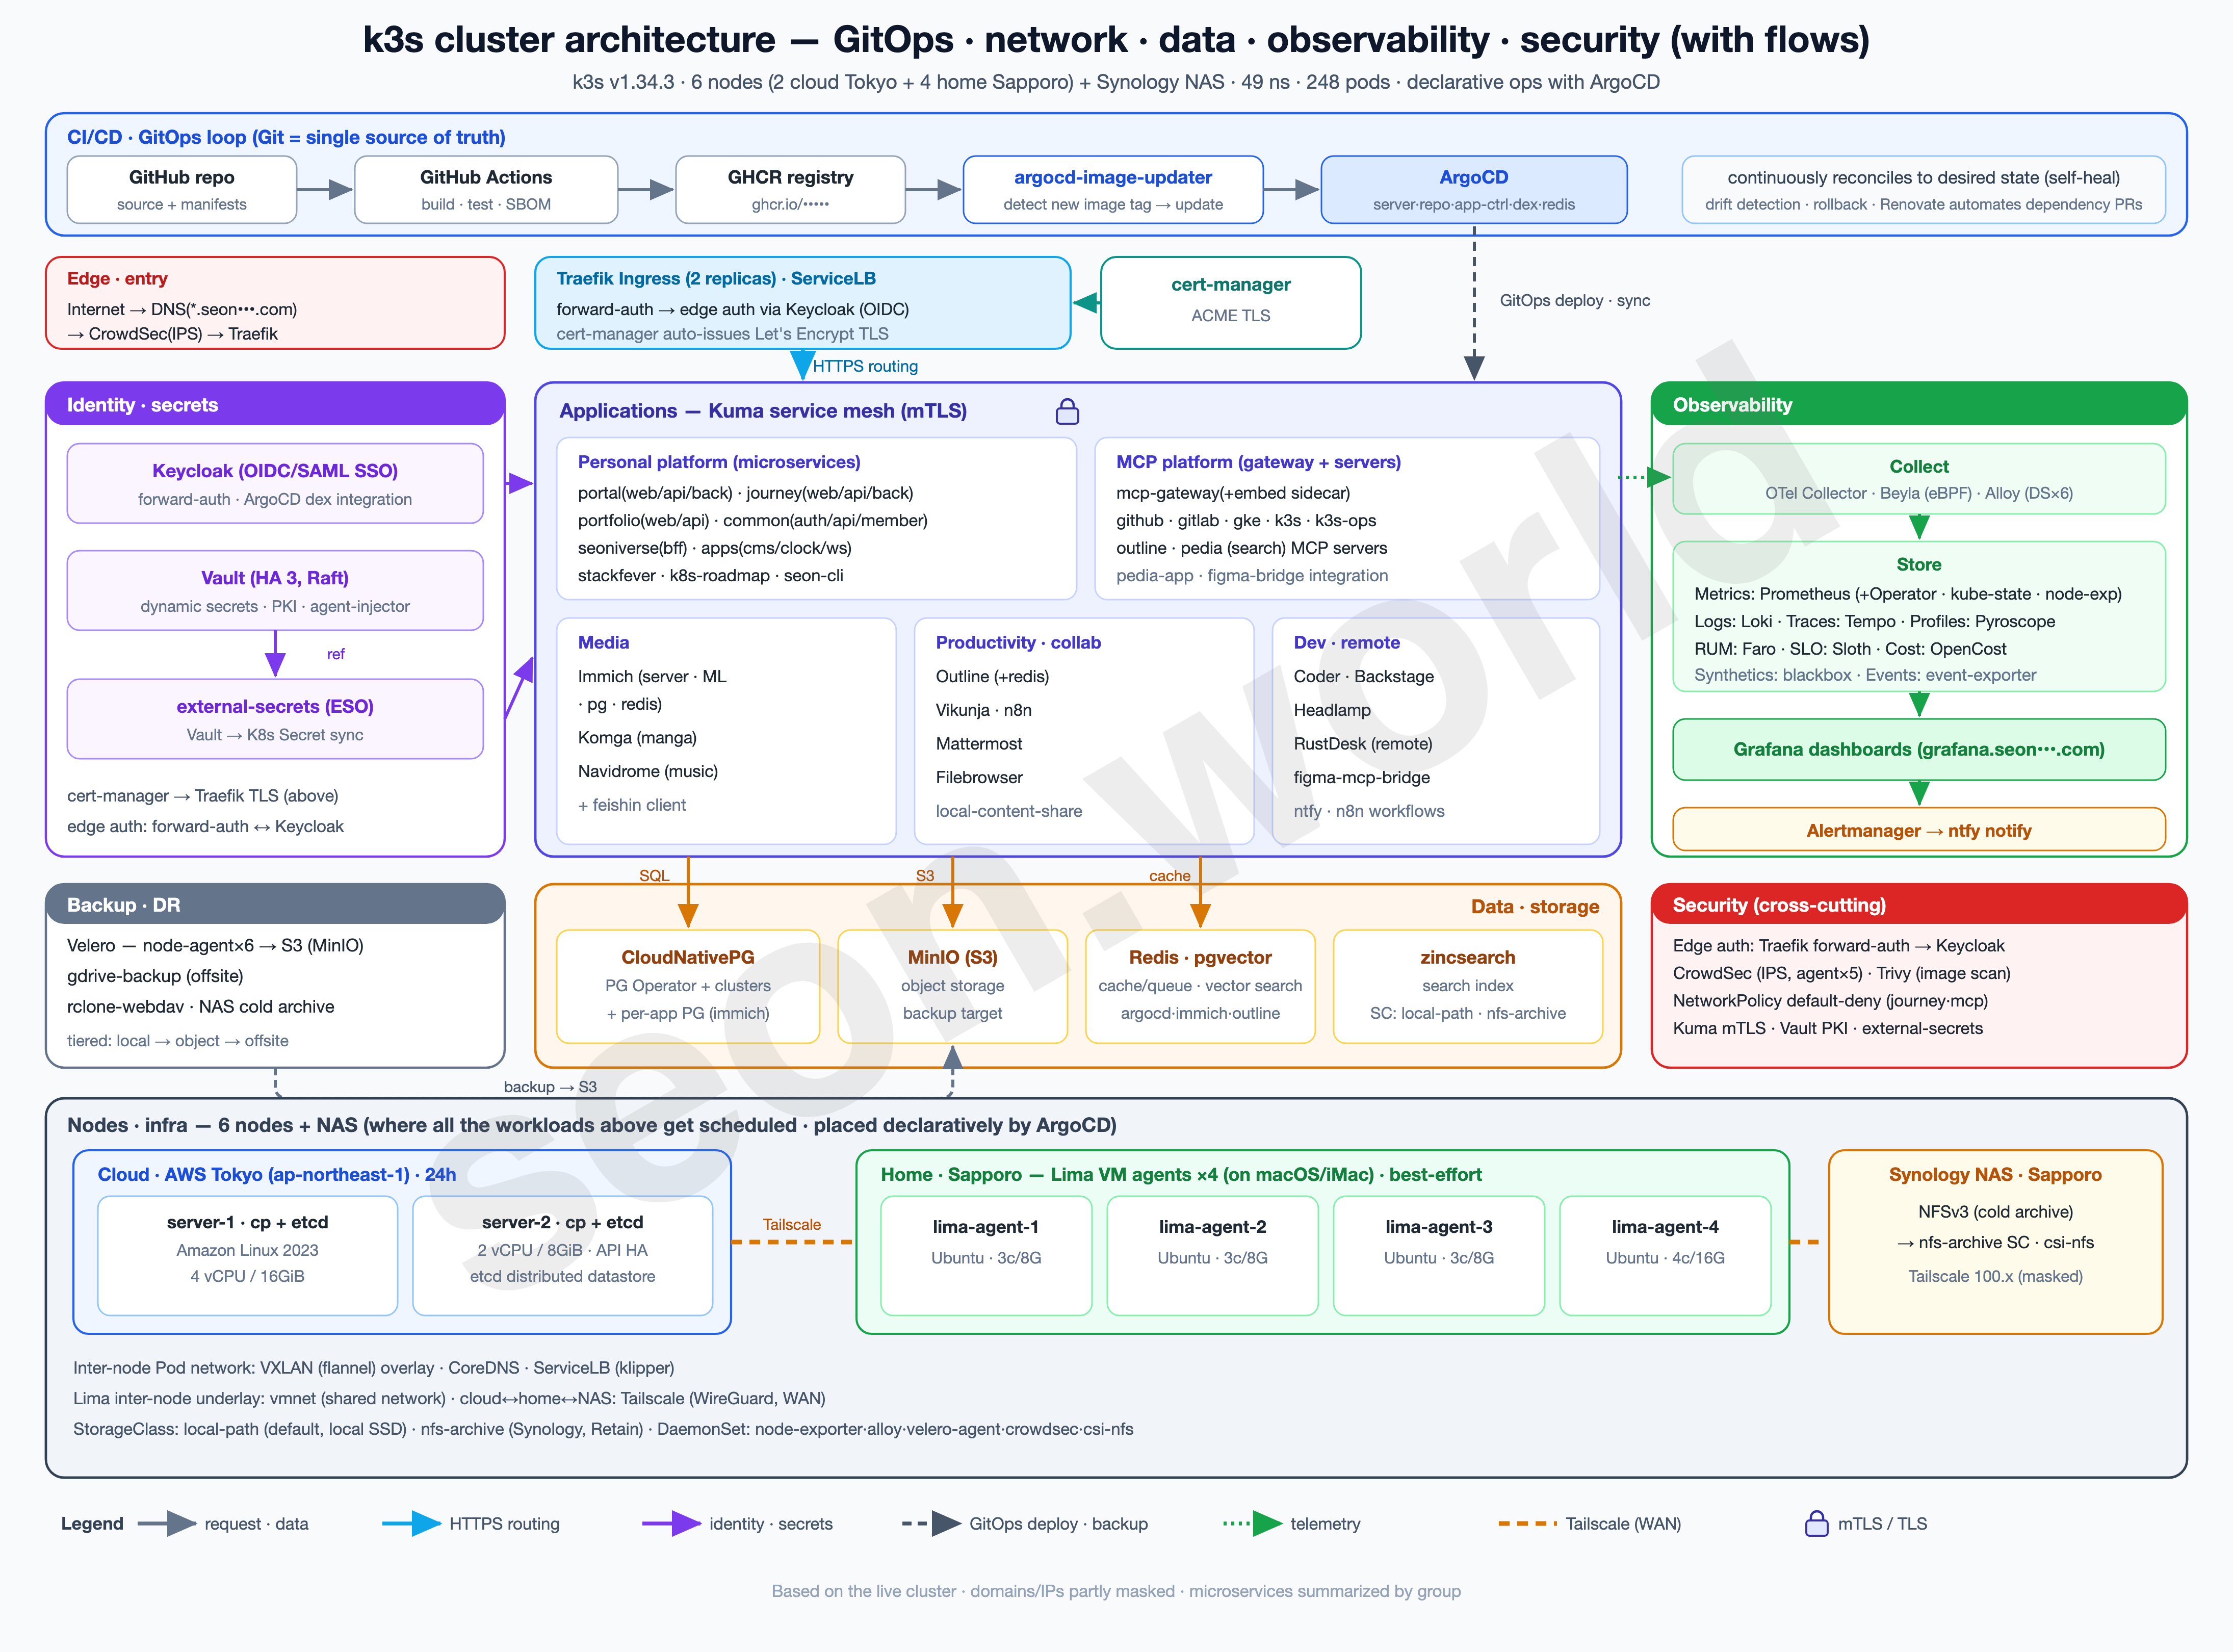
This series is a record — written one piece at a time — of how I actually built the homelab in the diagram above, the one that’s still running as I write this.
What began as a toy project from a simple “could this even work?” turned, through satisfying performance and endless tearing-down-and-rebuilding, into a genuine toy that takes the edge off the stress built up at work. It isn’t a resource-rich cluster, but it’s been more than enough to get a real taste of Kubernetes, and it keeps handing me the next thing I want to try.
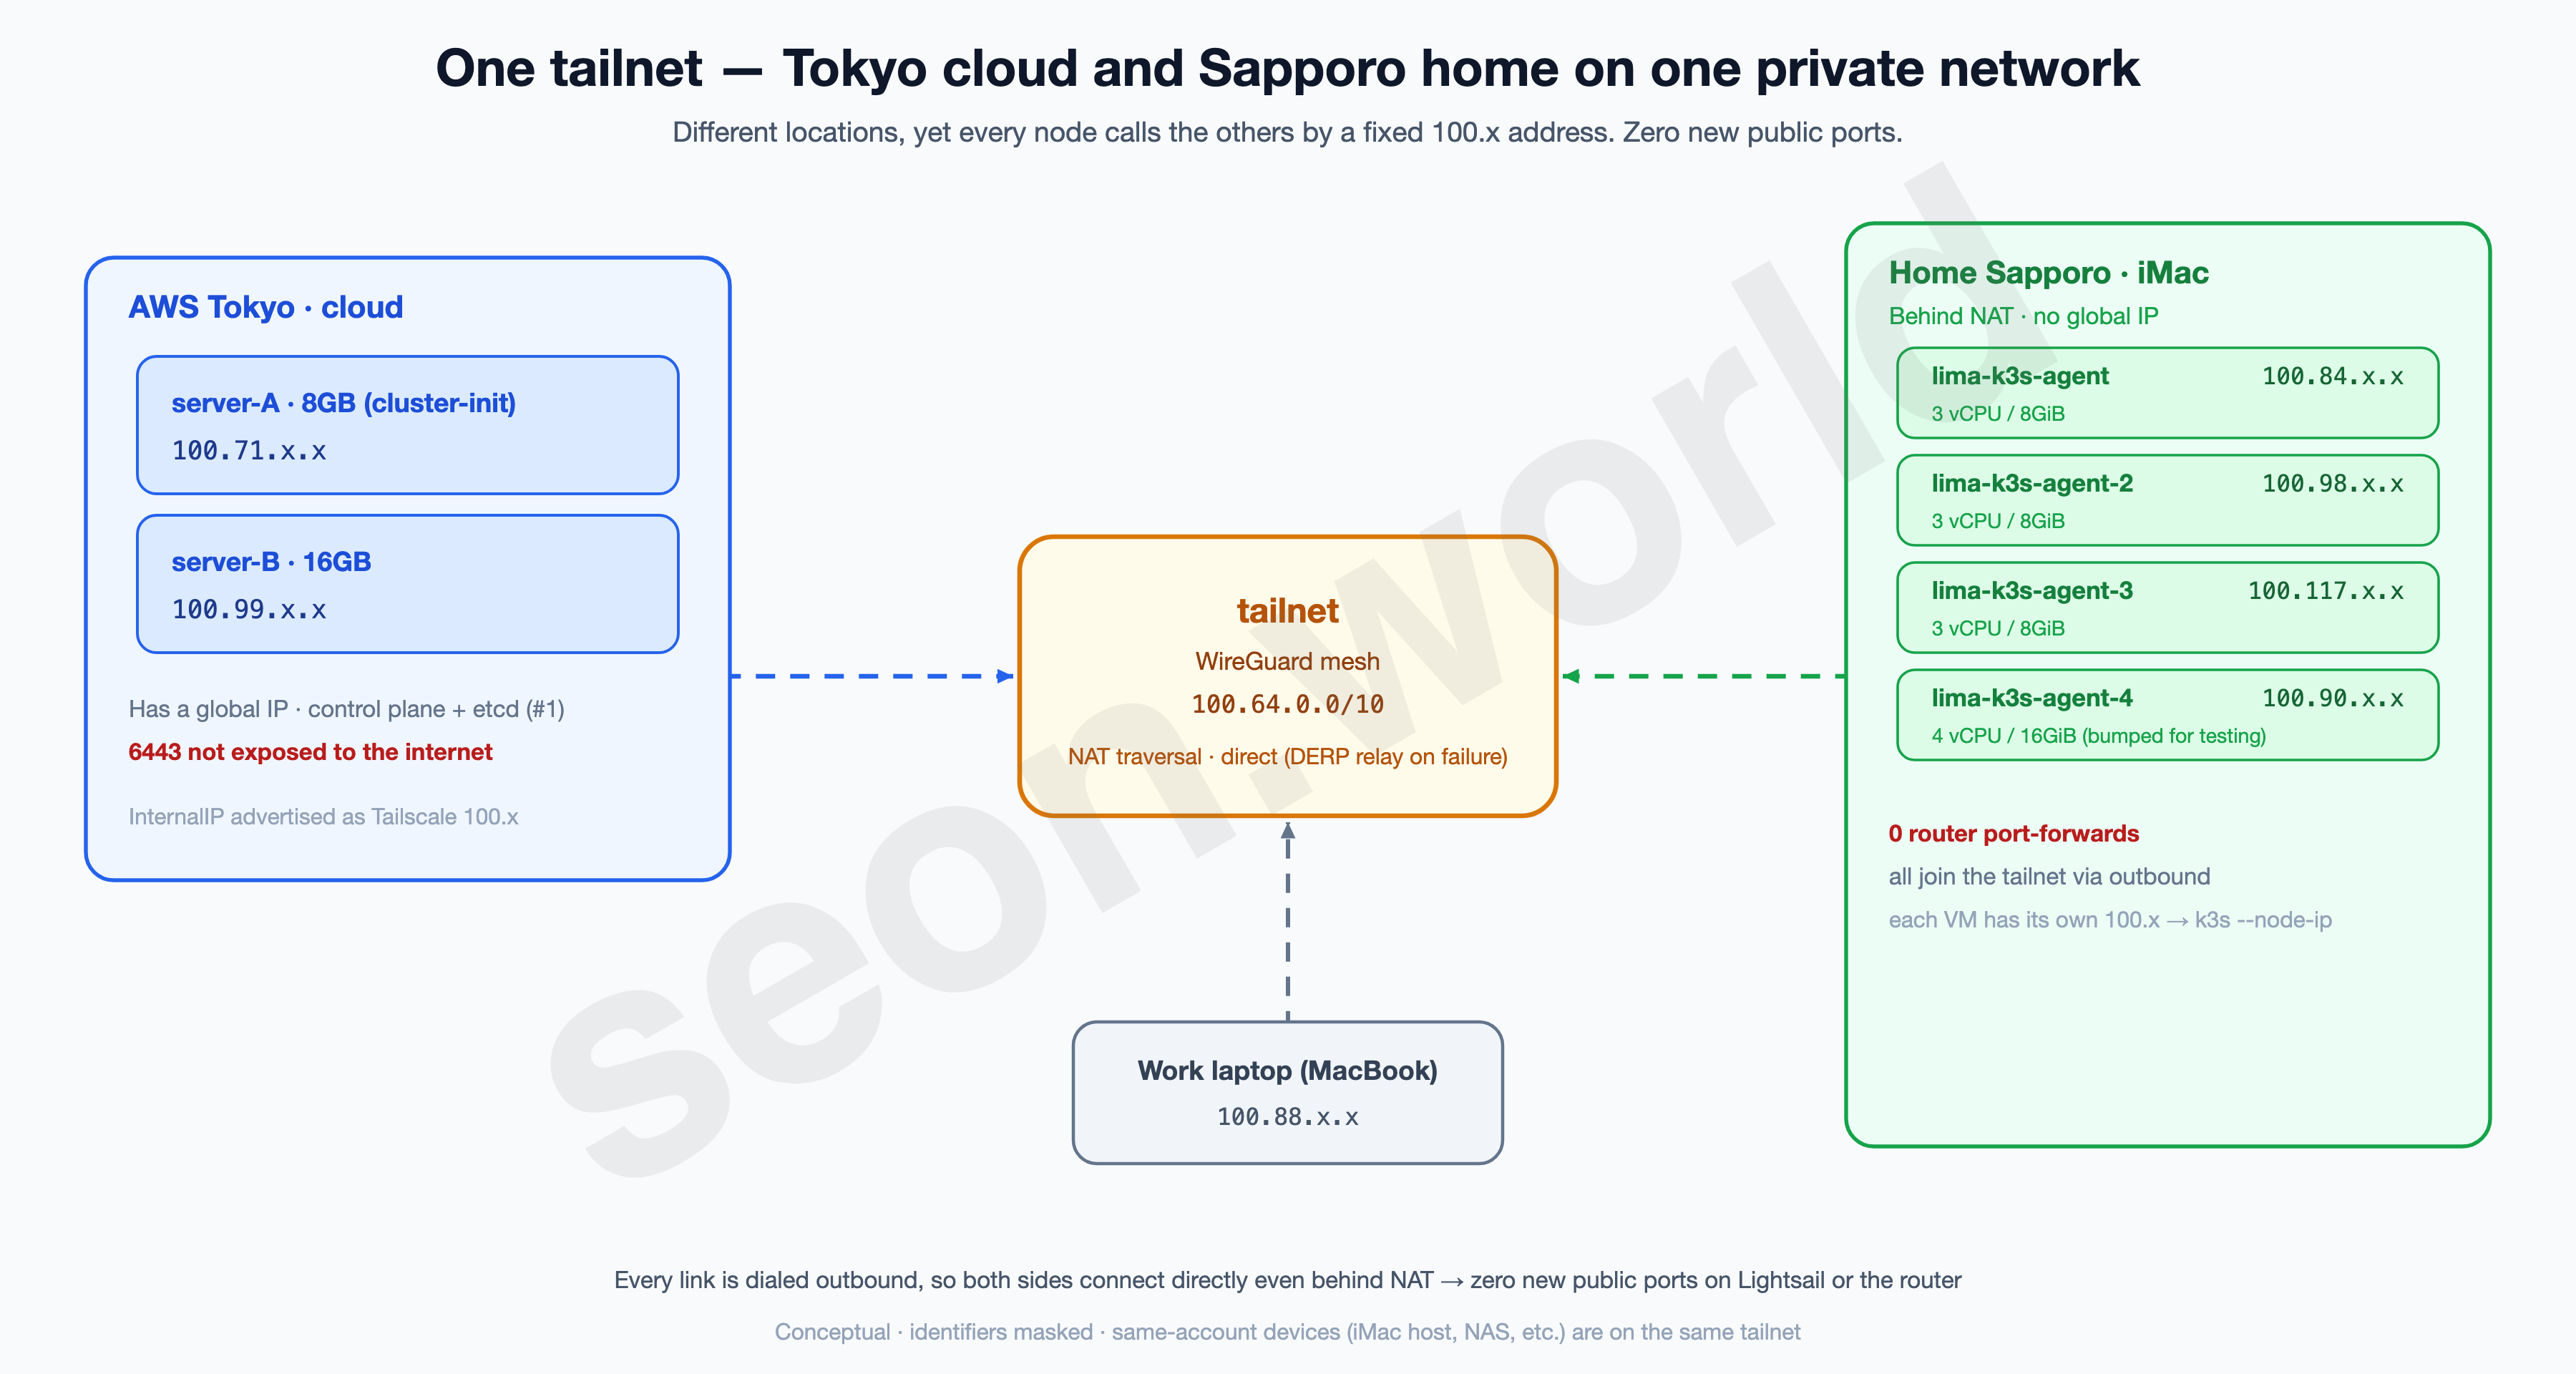
- 6 nodes — 2 Lightsail servers (control plane + etcd) in the cloud (AWS Tokyo) + 4 Lima VM agents on a home (Sapporo) iMac
- 19 vCPU / 61 GiB total, 49 namespaces, 248 pods (150 running)
- Deployed with ArgoCD, auth via Keycloak OIDC, with CloudNativePG, Vault, CrowdSec, Prometheus/Grafana and more running on top
This article is about taking the two-node cloud cluster from #1 and welcoming the iMac that was gathering dust at home — split into 4 Lima VMs that join as agents.
1. Background — welcoming the sleeping iMac as a teammate
What I built in #1 was the cloud-side foundation.
I put k3s on two AWS Lightsail instances (8GB and 16GB), formed a two-node control plane + embedded etcd, and bound both nodes over Tailscale so they could call each other by a 100.x address. Instead of the textbook three nodes I went with two, taking out insurance with automatic etcd snapshots — a cluster that was, in effect, just the “head.” (Plenty of apps are crammed onto those nodes too, penny-pincher that I am.)
This time I’m adding the “limbs.”
At home, a fairly old 64GB-RAM iMac sits idle. It’s slow — it has an HDD — but memory is the one thing it has plenty of, and its macOS is new enough to run virtualization (vz), so as a host it’s more than enough. The goal this time is to bring it in as a cluster worker.
But there was one thing to decide right at the start.
Bring the iMac in whole as a single node, or split it into several?
The easy path is whole.
Install Ubuntu on the iMac, stand up one k3s agent, and you’re done. But the whole point of this homelab is “to handle Kubernetes like the real thing.” With that in mind, I weighed the two options against the official guidance.
The limit of going whole (one node).
The Kubernetes docs recommend at least one instance per failure zone for fault tolerance. If the home side is a single node, that node is itself a single point of failure — and, more to the point, none of the practice that assumes multiple nodes is possible.
cordon/drain a node and shift its workloads off, spread Pods across nodes (anti-affinity), roll a node out and back in — with one node, all of it is meaningless.
The worth of splitting (multiple nodes).
Add several nodes and the blast radius shrinks, while spreading becomes possible. learnkube’s worker-node sizing analysis shows this in numbers — with five nodes you can scatter five replicas onto separate nodes, so losing one node costs you at most one replica.
With only two nodes, no matter how many replicas you add, the effective spread tops out at two.
Splitting isn’t free, of course.
As that same article points out, every node reserves resources for kubelet and the OS — a 1 vCPU/4GB node gives up about 1.1GB, a 4 vCPU/32GB node about 3.66GB — so the finer you slice, the larger the system-overhead ratio. The pods-per-node count is also capped at 110 by default. In short, “infinitely fine” isn’t the answer; you want a balance point of reasonably sized nodes in a reasonable number.
The conclusion was to split.
For a learning-focused homelab where you want to handle scheduling and failure “like a real cluster,” the home side should be multiple nodes too. That 64GB of memory is what makes the luxury possible. (How many to split into is decided in §3.)
And here another question branches off. How do you split one physical machine into multiple nodes?
2. Lima VM
There are several ways to turn one physical iMac into multiple k3s nodes. I lined up the candidates and filtered them against this homelab’s conditions (“run headless as a server around the clock, mass-produce identical machines reproducibly, keep macOS”).
The biggest fork is fake the nodes with containers, or make real nodes with VMs.
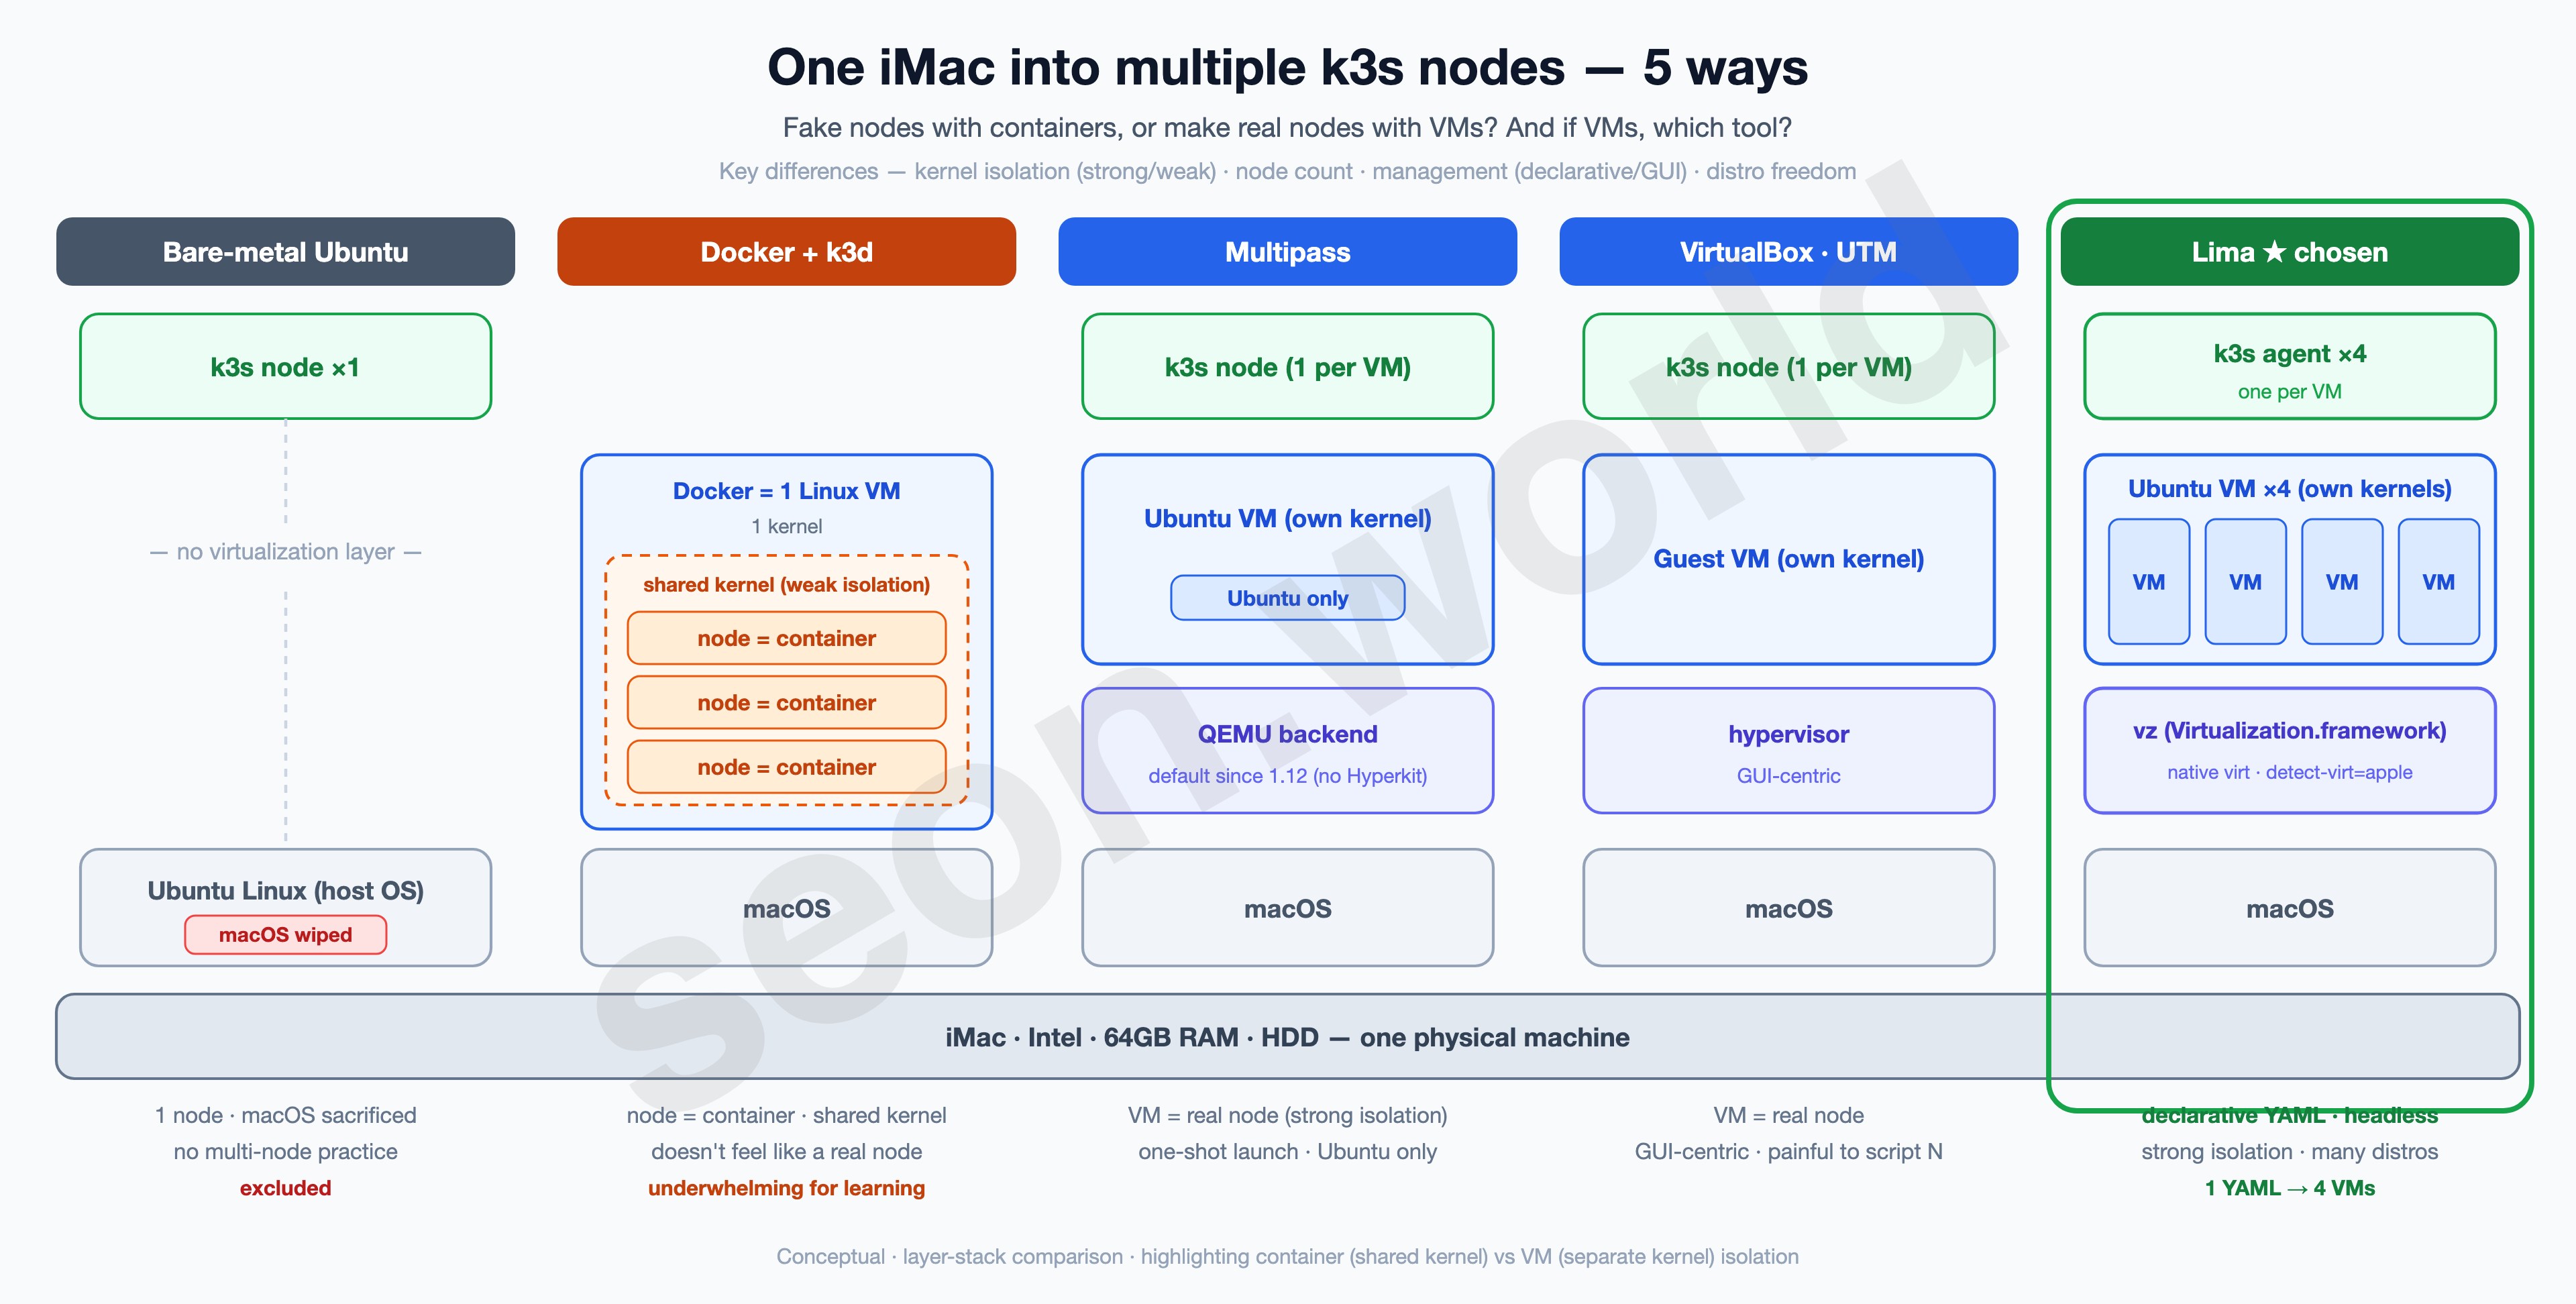
| Method | Character | For this situation |
|---|---|---|
| Bare-metal Ubuntu reinstall | Install Linux straight on the iMac, one node | Have to wipe macOS, and you still end up with one node → conflicts with the point of splitting, excluded |
| Docker + k3d | Stand up k3s in containers to mimic multi-node | Nodes are containers, so they share the host kernel (weak isolation); the “real node” feel is thin → underwhelming for learning |
| Multipass (Canonical) | Launch an Ubuntu VM in one line | VM = real node, fine, but Ubuntu only, and it leans toward one-shot launches rather than declaratively mass-producing identical VMs (the backend has been QEMU by default since 1.12) |
| VirtualBox / VMware Fusion | Traditional GUI hypervisors | Run on Intel Macs but heavy and GUI-centric; scripting N of them is a pain |
| UTM | A macOS GUI front end for QEMU | Nice for making 1–2 by GUI, but not a great fit for headless / reproducibility |
| Colima | ”Containers on Lima,” a Docker/k8s abstraction | Uses Lima underneath; its aim is providing a container runtime, not defining VMs directly |
| Lima | Headless Linux VMs from declarative YAML | One YAML reproduces the same VM any number of times, headless, containerd-friendly, native speed on the vz backend ← chosen |
As the diagram shows, with k3d the nodes are containers sharing one kernel. It’s fast and light, but because the kernels aren’t isolated between nodes, it’s a step removed from the feel of “operating real nodes.” The rest (Multipass, VirtualBox, UTM, Lima) are VMs, each with its own kernel, so isolation is strong. What separates them further is management style and backend.
Lima (Linux Machines) is an open-source tool for standing up headless Linux VMs on macOS. I chose it for three reasons.
- Declarative and reproducible. Write the VM’s spec (CPU, memory, disk, distro) in YAML, and the same definition mass-produces four identical VMs as-is. That’s a different level of reproducibility from clicking through a GUI four times.
- Suits headless. It runs as an always-on server, so no GUI is needed. Lima runs entirely from the CLI (
limactl). - Fast backend. Since v1.0, on macOS (13.5+) Lima uses vz (Apple Virtualization.framework) as the default backend. Running an Intel VM on an Intel Mac this time means native virtualization, not emulation, so it’s light. (On older macOS where vz isn’t available, you can fall back to
vmType: qemu.)
The third point is grounded in the Lima vmType docs.
How Lima works
It looks like “a tool for standing up Linux VMs on a Mac,” but once you see the structure, it becomes clear why it gets reproducibility and speed at the same time.
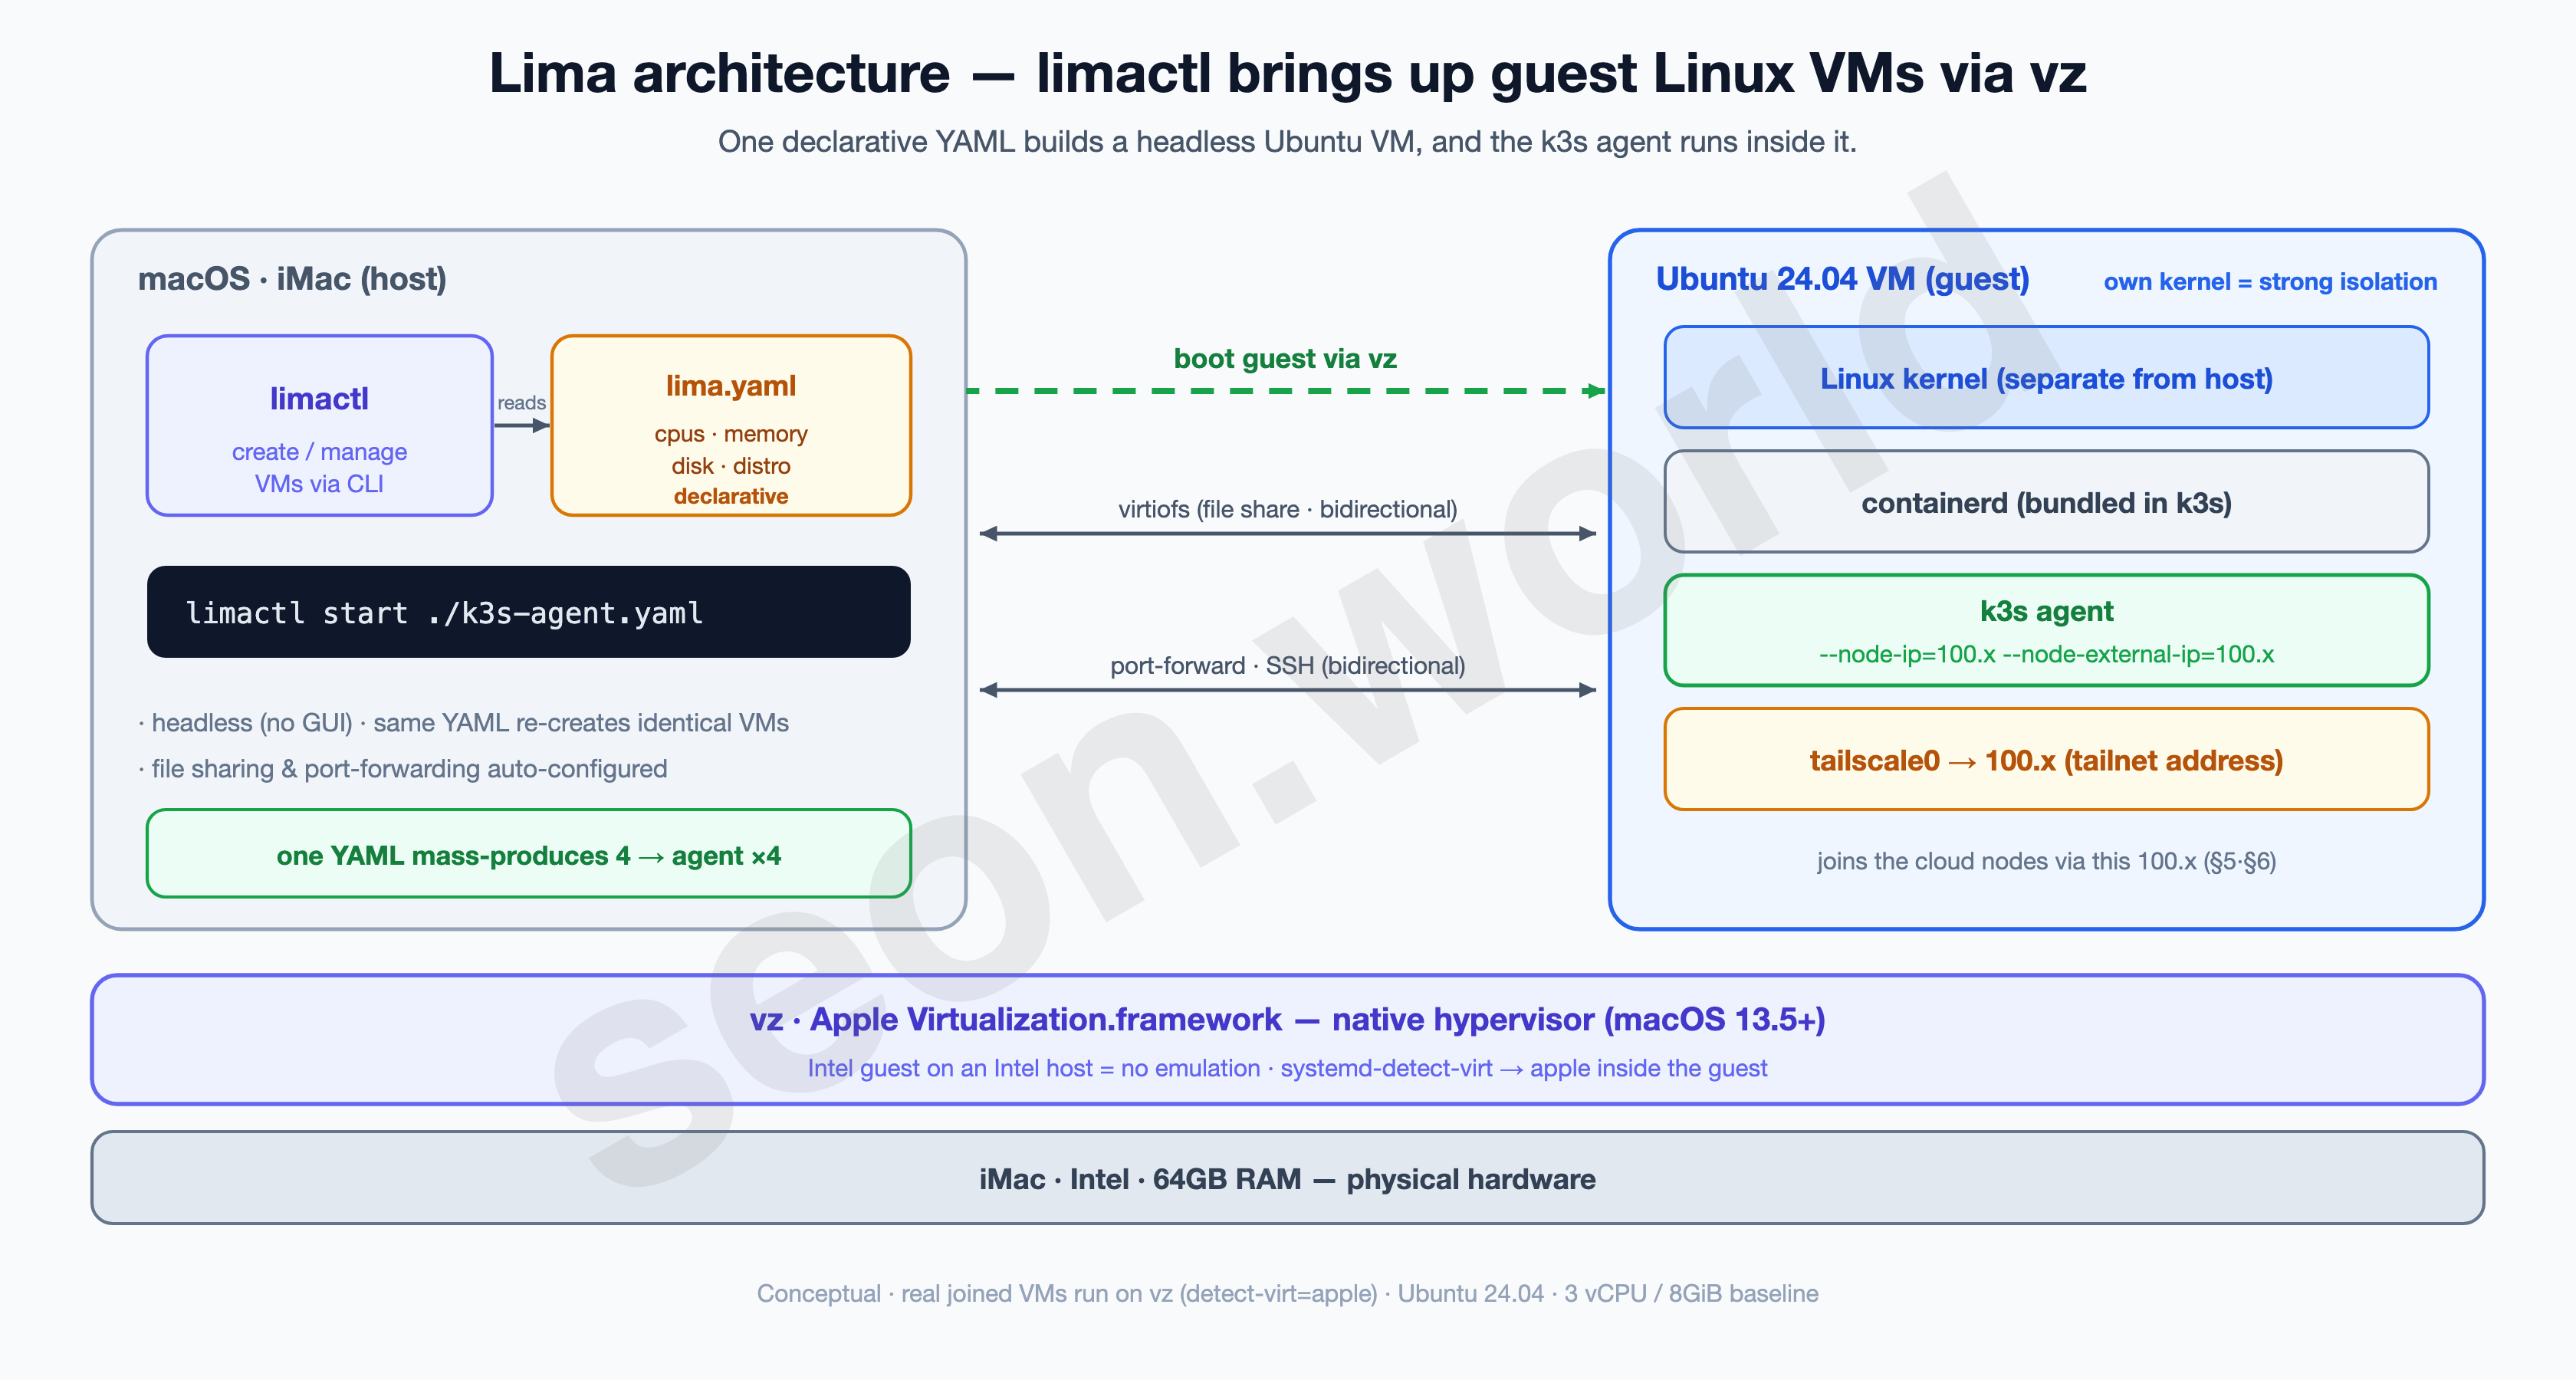
limactl(host CLI) — Lima’s core. One line,limactl start ./k3s-agent.yaml, builds and boots a VM exactly to the spec in the YAML. With no GUI, drop it in a script and loop four times to stand up four identical VMs.lima.yaml(declarative config) — a single file holding the VM’s CPU, memory, disk, distro, and provisioning scripts. It’s the “VM blueprint,” so sharing the same file gets anyone the same VM.- vz (Apple Virtualization.framework) — the hypervisor that actually runs the VM. It’s Lima’s default on macOS 13.5+, and since it runs an Intel guest on an Intel host, it runs natively with no emulation. Run
systemd-detect-virtinside a joined VM and you’ll seeapple— the proof. - Guest VM (Ubuntu) — has its own Linux kernel, separate from the host. On top of it run containerd (bundled in k3s) and the k3s agent, and a separately installed Tailscale gives the
tailscale0interface a100.xaddress. The VM joins the cloud nodes over this100.x(§5·§6). - Host ↔ guest links — Lima sets up virtiofs file sharing, port-forwarding, and SSH automatically. So you drop straight into the VM from the Mac terminal and exchange files.
In short: “one blueprint (YAML) →
limactlboots it via vz → a real node with its own kernel.” For the conditions “the same machine, many times, by script, lightly,” Lima fit best.
3. Splitting into meaningful units
Once splitting was decided, what’s left is the count. There’s a reason I went with four rather than two or eight.
The yardstick was RAM. What caps the node count is memory, not CPU. Several VMs can time-share CPU (oversubscription), but memory can’t be — once you allocate it, it’s gone.
Leave about half of the 64GB for the macOS host and headroom, and the VMs’ share is around 32GB. How many pieces to split that into?
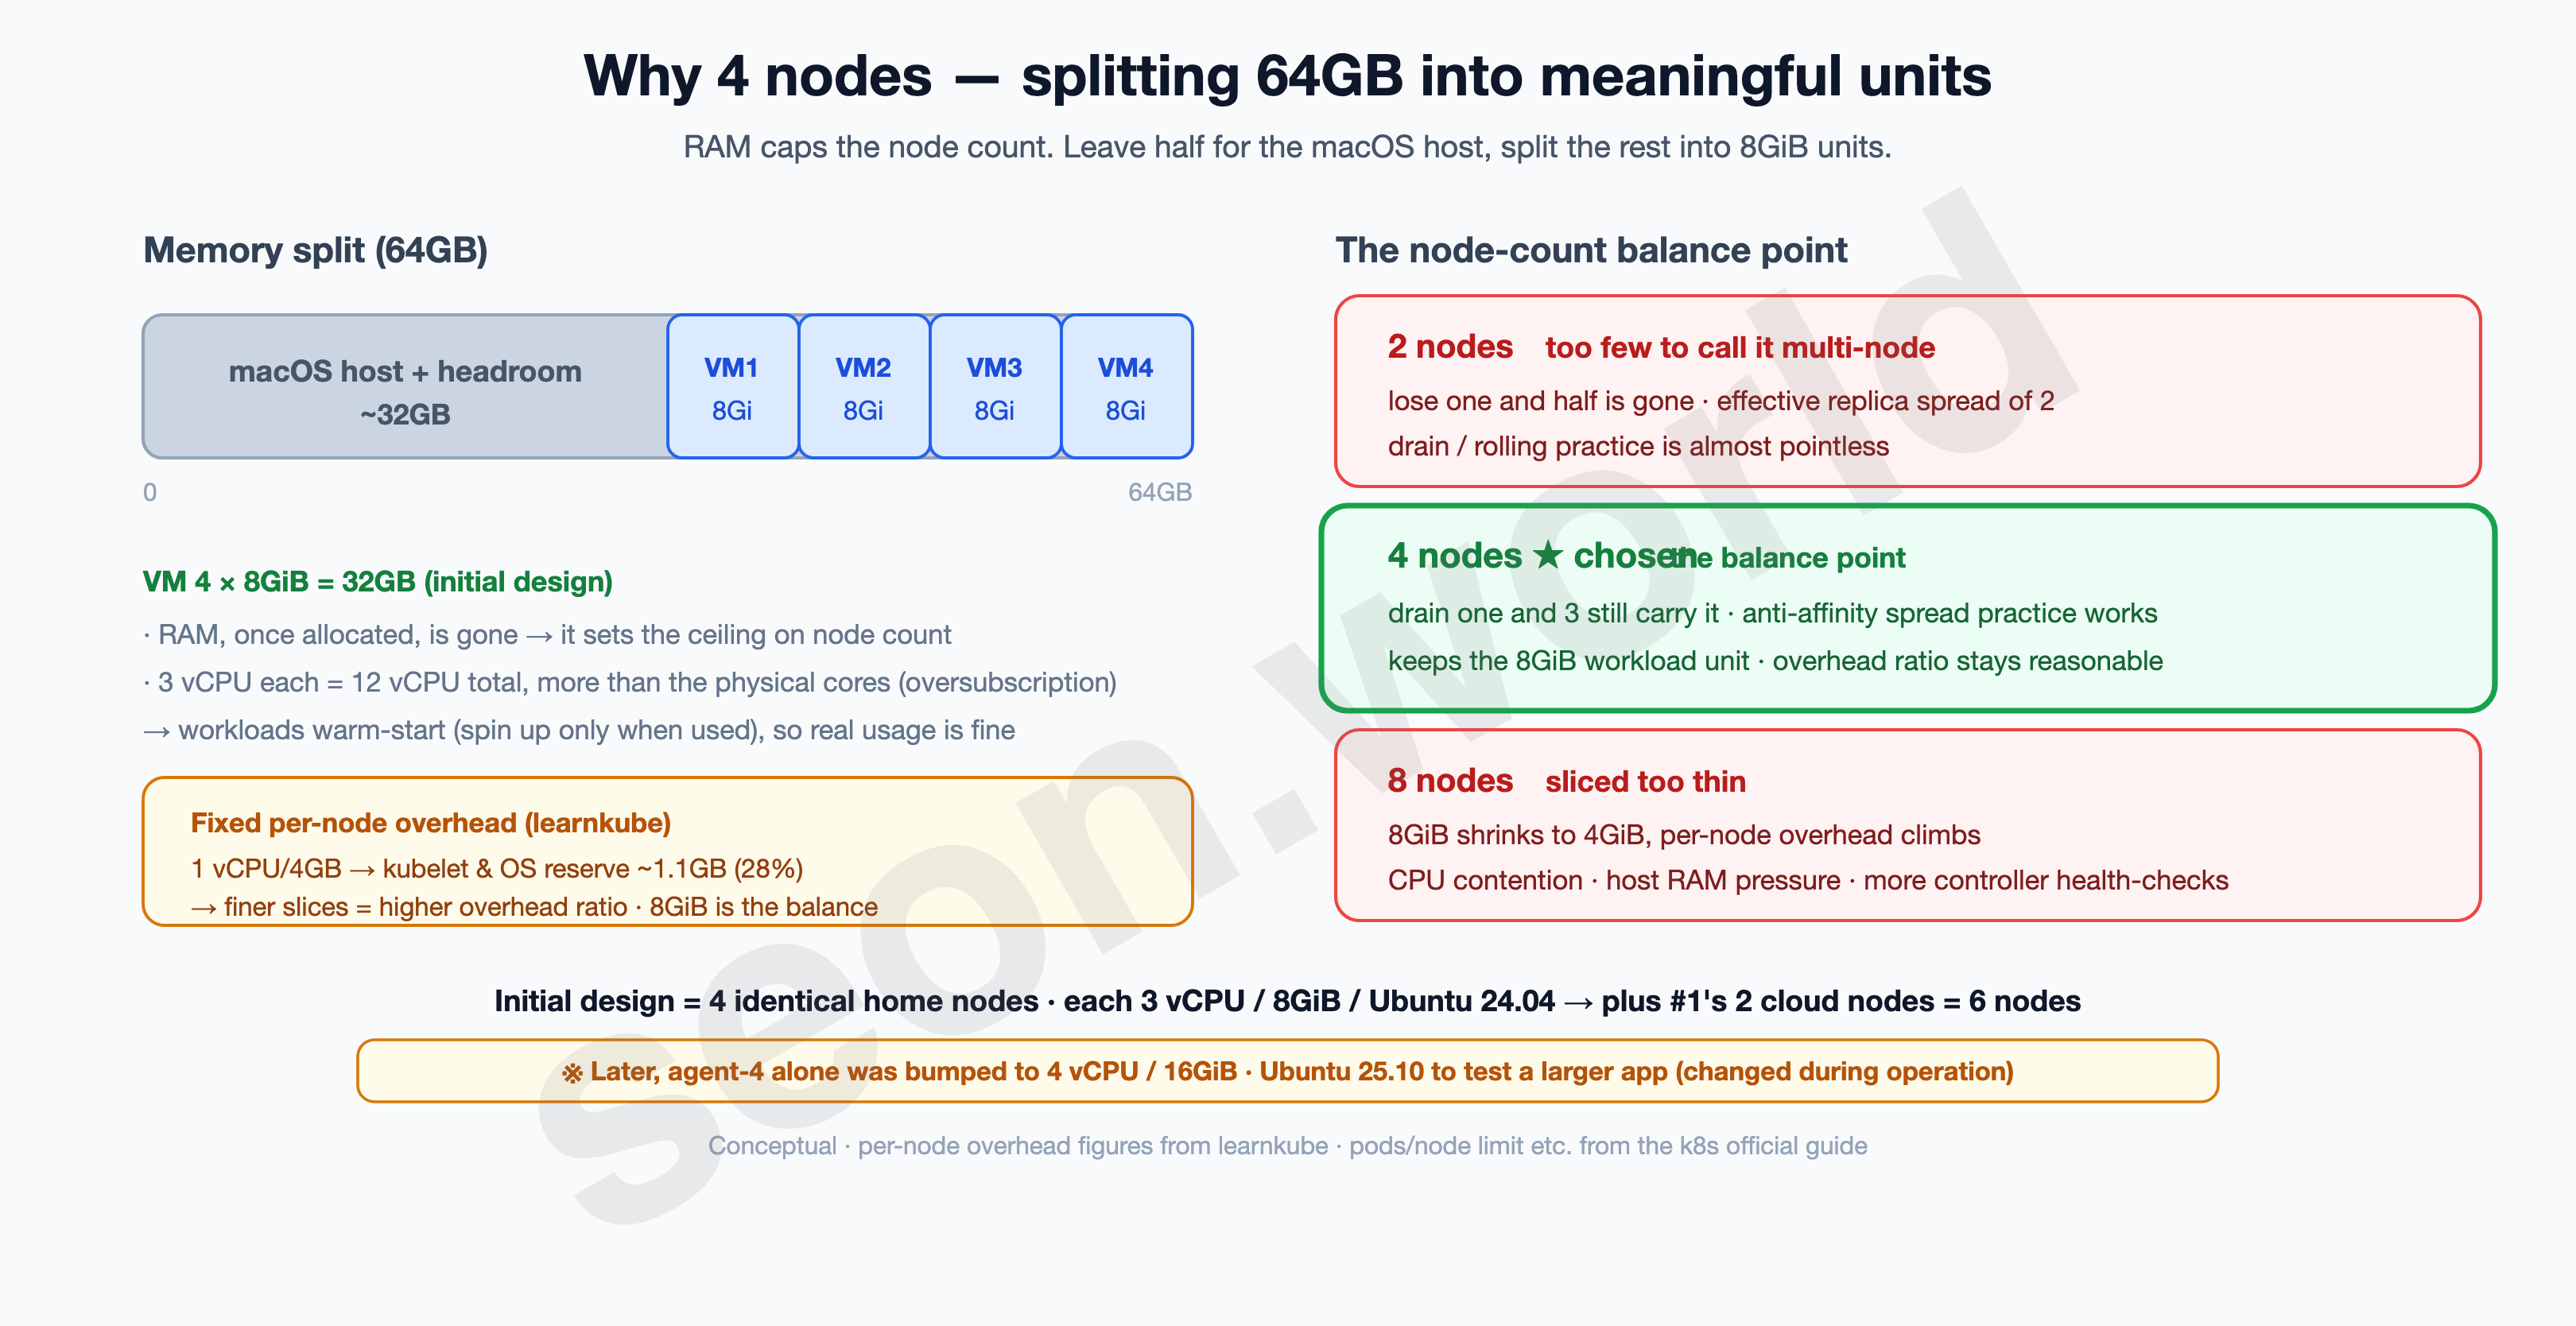
The minimum size of one node.
Slice too finely and the fixed overhead each node reserves for kubelet and the OS starts to stand out. In learnkube’s numbers, a 1 vCPU/4GB node hands over about 1.1GB (28%!) to the system. Around 8GiB that ratio becomes bearable, leaving room to run a meaningful workload on top. So I made one VM = 8GiB the unit.
Balancing the count. 32GB ÷ 8GiB = 4 nodes. The numbers lined up, and it fits the learning goal too.
- Two is too few to call multi-node. Lose one and half is gone, and however many replicas you spread, the effective spread is two.
- Eight shrinks 8GiB to 4GiB, pushing the per-node overhead ratio back up, while eight VMs fight over the host’s cores — CPU contention and host-RAM pressure get rough. The more nodes there are, the more the node controller’s health-check load grows too.
- Four is the lowest count where you can
drainone node and have three carry it, spread Pods with anti-affinity, and practice rolling a node out and back — while still keeping the 8GiB workload unit.
Why being short on CPU is fine.
I gave each one 3 vCPU, so four make 12 vCPU. That’s more than the host’s physical core count — honestly, the cores don’t add up to that total (oversubscription). It still works because most of this homelab’s workloads are warm-start: they sleep on minimal resources when unused and wake on a request. Not every Pod runs at full load at once; they wake and sleep on a stagger, so several VMs sharing the physical cores is no strain in real use. Unlike memory, CPU is time-shared — which is exactly why oversubscription holds up under virtualization.
To sum up, the initial design is 4 home nodes, each 3 vCPU / 8GiB / 300GiB disk / Ubuntu 24.04 LTS. Add #1’s two cloud control-plane nodes and you reach the target of six.
| Home node (initial, all 4 the same) | Value |
|---|---|
| vCPU | 3 |
| Memory | 8 GiB |
| Disk | 300 GiB |
| OS | Ubuntu 24.04 LTS |
| Role | k3s agent (workload only) |
One thing up front. The above is the initial design, and three of the four are still like that. But while operating it — trying out a larger app, checking compatibility against a different OS version — I bumped just the fourth node (agent-4) to 4 vCPU / 16GiB and reinstalled it on Ubuntu 25.10. So when you run
limactl listin §4, one machine looks different.
4. Installing Lima and defining the VM
From here it’s hands-on. The order is ① install Lima → ② write the VM blueprint (YAML) → ③ start four → ④ verify. Every output below was taken on this actual iMac.
4-1. Install Lima (host = the iMac’s macOS)
One line with Homebrew.
brew install lima
limactl --version
limactl version 2.0.3Making vz the default backend needs macOS 13.5 or newer (this iMac meets that). On a lower version, change vmType to qemu in the YAML below — slower, but it works the same.
4-2. The VM blueprint — k3s-agent.yaml
To keep the four identical, I freeze the definition into one file. This YAML is the blueprint for all four nodes.
# k3s-agent.yaml — shared blueprint for the 4 home nodes (Lima)
images:
  - location: "https://cloud-images.ubuntu.com/releases/24.04/release/ubuntu-24.04-server-cloudimg-amd64.img"
    arch: "x86_64"
cpus: 3
memory: "8GiB"
disk: "300GiB"
# vmType omitted → vz is automatic on macOS 13.5+ (use vmType: "qemu" on older macOS)
# mounts/containerd left at defaults. As a node, no host-directory sharing needed.
The points that matter:
images— the Ubuntu 24.04 LTS cloud image (x86_64, since it’s Intel). The same image as Lima’s defaultubuntu-24.04template. (On Apple Silicon, switch to anarch: "aarch64"image.)cpus/memory/disk— the 3 vCPU / 8GiB / 300GiB decided in §3.- Omitting
vmTypeis deliberate — on macOS 13.5+, vz is chosen automatically. That’s whysystemd-detect-virtreadsappleinside the VM.
Note — disk is sparse (thin) allocated, but the part you use is really used.
disk: 300GiBis a ceiling, so it only takes the image’s size at first, but as four of them fill up they eat a good chunk of the host disk in total. On an HDD especially, leave generous room.
4-3. Start four
Same blueprint, only the name changes, four times.
for n in k3s-agent k3s-agent-2 k3s-agent-3 k3s-agent-4; do
  limactl start --name="$n" ./k3s-agent.yaml --tty=false
done
Lima prefixes the instance name with lima- to make the hostname → lima-k3s-agent, lima-k3s-agent-2, … . That name later shows up as-is as the node name in kubectl get nodes. (--tty=false is for automation — create it without opening an editor.)
4-4. Verify (real output)
Check on the host that four came up.
limactl listNAME STATUS SSH CPUS MEMORY DISK DIR
k3s-agent Running 127.0.0.1:61372 3 8GiB 300GiB ~/.lima/k3s-agent
k3s-agent-2 Running 127.0.0.1:61392 3 8GiB 300GiB ~/.lima/k3s-agent-2
k3s-agent-3 Running 127.0.0.1:60490 3 8GiB 300GiB ~/.lima/k3s-agent-3
k3s-agent-4 Running 127.0.0.1:61460 4 16GiB 300GiB ~/.lima/k3s-agent-4All four are Running.
Drop into a VM and check its spec, virtualization backend, and OS.
limactl shell k3s-agent -- nproc
limactl shell k3s-agent -- systemd-detect-virt
limactl shell k3s-agent -- free -h
limactl shell k3s-agent -- grep PRETTY_NAME /etc/os-release
3
apple
total used free shared buff/cache available
Mem: 7.8Gi 2.3Gi 744Mi 232Mi 5.3Gi 5.5Gi
Swap: 0B 0B 0B
PRETTY_NAME="Ubuntu 24.04.3 LTS"3 vCPU, ~7.8GiB of memory, systemd-detect-virt reading apple (proof it’s on vz), Ubuntu 24.04.3 LTS. (used/buff/cache are already loaded because this node is running k3s workloads right now — right after creation it’d be nearly empty.)
Only k3s-agent-4, swapped during operation, has a different OS.
limactl shell k3s-agent-4 -- grep PRETTY_NAME /etc/os-release
limactl shell k3s-agent-4 -- nproc
PRETTY_NAME="Ubuntu 25.10"
4From the cluster’s point of view, a different OS version is no problem — as long as the k3s version and container runtime line up (confirmed in §7).
At this point four Ubuntu VMs are up on the iMac (three at the initial spec, one beefed up for testing). They’re still just four Linux machines with nothing to do with the cluster. Next is Tailscale (§5), which binds these four and the Tokyo cloud nodes into one private network.
5. Tailscale — binding the four into one private network with the Tokyo cluster
What §4 produced is four empty Ubuntu VMs on the iMac. To bind them with the Tokyo cloud nodes, there’s a problem to solve first.
Home has no global IP. It’s behind the router’s NAT, so you can’t open a connection from outside (the cloud) to a home VM first. You could punch a hole with port-forwarding + DDNS, but I’d rather not touch the router and expose the home IP to the internet. And the answer to this was already decided back in #1 — Tailscale.
Tailscale is a WireGuard-based mesh VPN. Every machine dials outbound, so even with both sides behind NAT they connect directly (falling back to a DERP relay if the direct path fails), and each machine gets a fixed private address in the 100.64.0.0/10 range. Since #1 already bound the two cloud nodes this way, this time it’s just adding the four home VMs to the same tailnet.
Why install Tailscale per VM? Because the k3s agent uses a Tailscale 100.x as the address it advertises itself on (--node-ip) (confirmed with the real flags in §6). Each node needs one fixed 100.x, so Tailscale goes on each of the four VMs.
5-1. Install Tailscale on each VM
Same one line on all four.
curl -fsSL https://tailscale.com/install.sh | shEither run it by dropping into each VM with limactl shell, or put it in the provisioning script of §4-2’s lima.yaml so it installs automatically when the VM is created.
5-2. Auth — an auth key, since it’s headless
The VMs have no browser, so instead of interactive login I authenticate non-interactively with an auth key. Issue one Reusable key in the Tailscale admin console under Settings → Keys (reusable so the same key works for all four) and a tskey-auth-… string appears. It’s shown only once, so copy it right then.
On each VM:
sudo tailscale up --auth-key=tskey-auth-XXXXXXXX...I joined them on a tagless personal account — keeping it simple. To lock access down further, you can layer on tags (like tag:server) and an ACL policy.
5-3. Verify — six nodes on one tailnet
Check that each VM got a 100.x.
limactl shell k3s-agent -- tailscale ip -4100.84.x.xLook at the whole tailnet.
limactl shell k3s-agent -- tailscale status100.84.x.x lima-k3s-agent me@… linux -
100.98.x.x lima-k3s-agent-2 me@… linux active; direct
100.117.x.x lima-k3s-agent-3 me@… linux active; direct
100.90.x.x lima-k3s-agent-4 me@… linux active; direct
100.71.x.x ip-172-26-3-146 me@… linux active; direct # cloud server-A (#1)
100.99.x.x ip-172-26-2-70 me@… linux active; direct # cloud server-B (#1)
100.88.x.x seon-mbp-m4 me@… macOS - # work laptopOther same-account devices (the iMac host, NAS, and so on) show up too, but I trimmed them above. active; direct is the mark of a direct connection with no DERP relay (NAT traversal succeeded). With that, the four home VMs and the two Tokyo cloud boxes reach each other by 100.x inside one tailnet.
5-4. Firewall — Tailscale opens zero new public ports
Let’s stop here a moment and check: “did I just expose anything extra to the internet?”
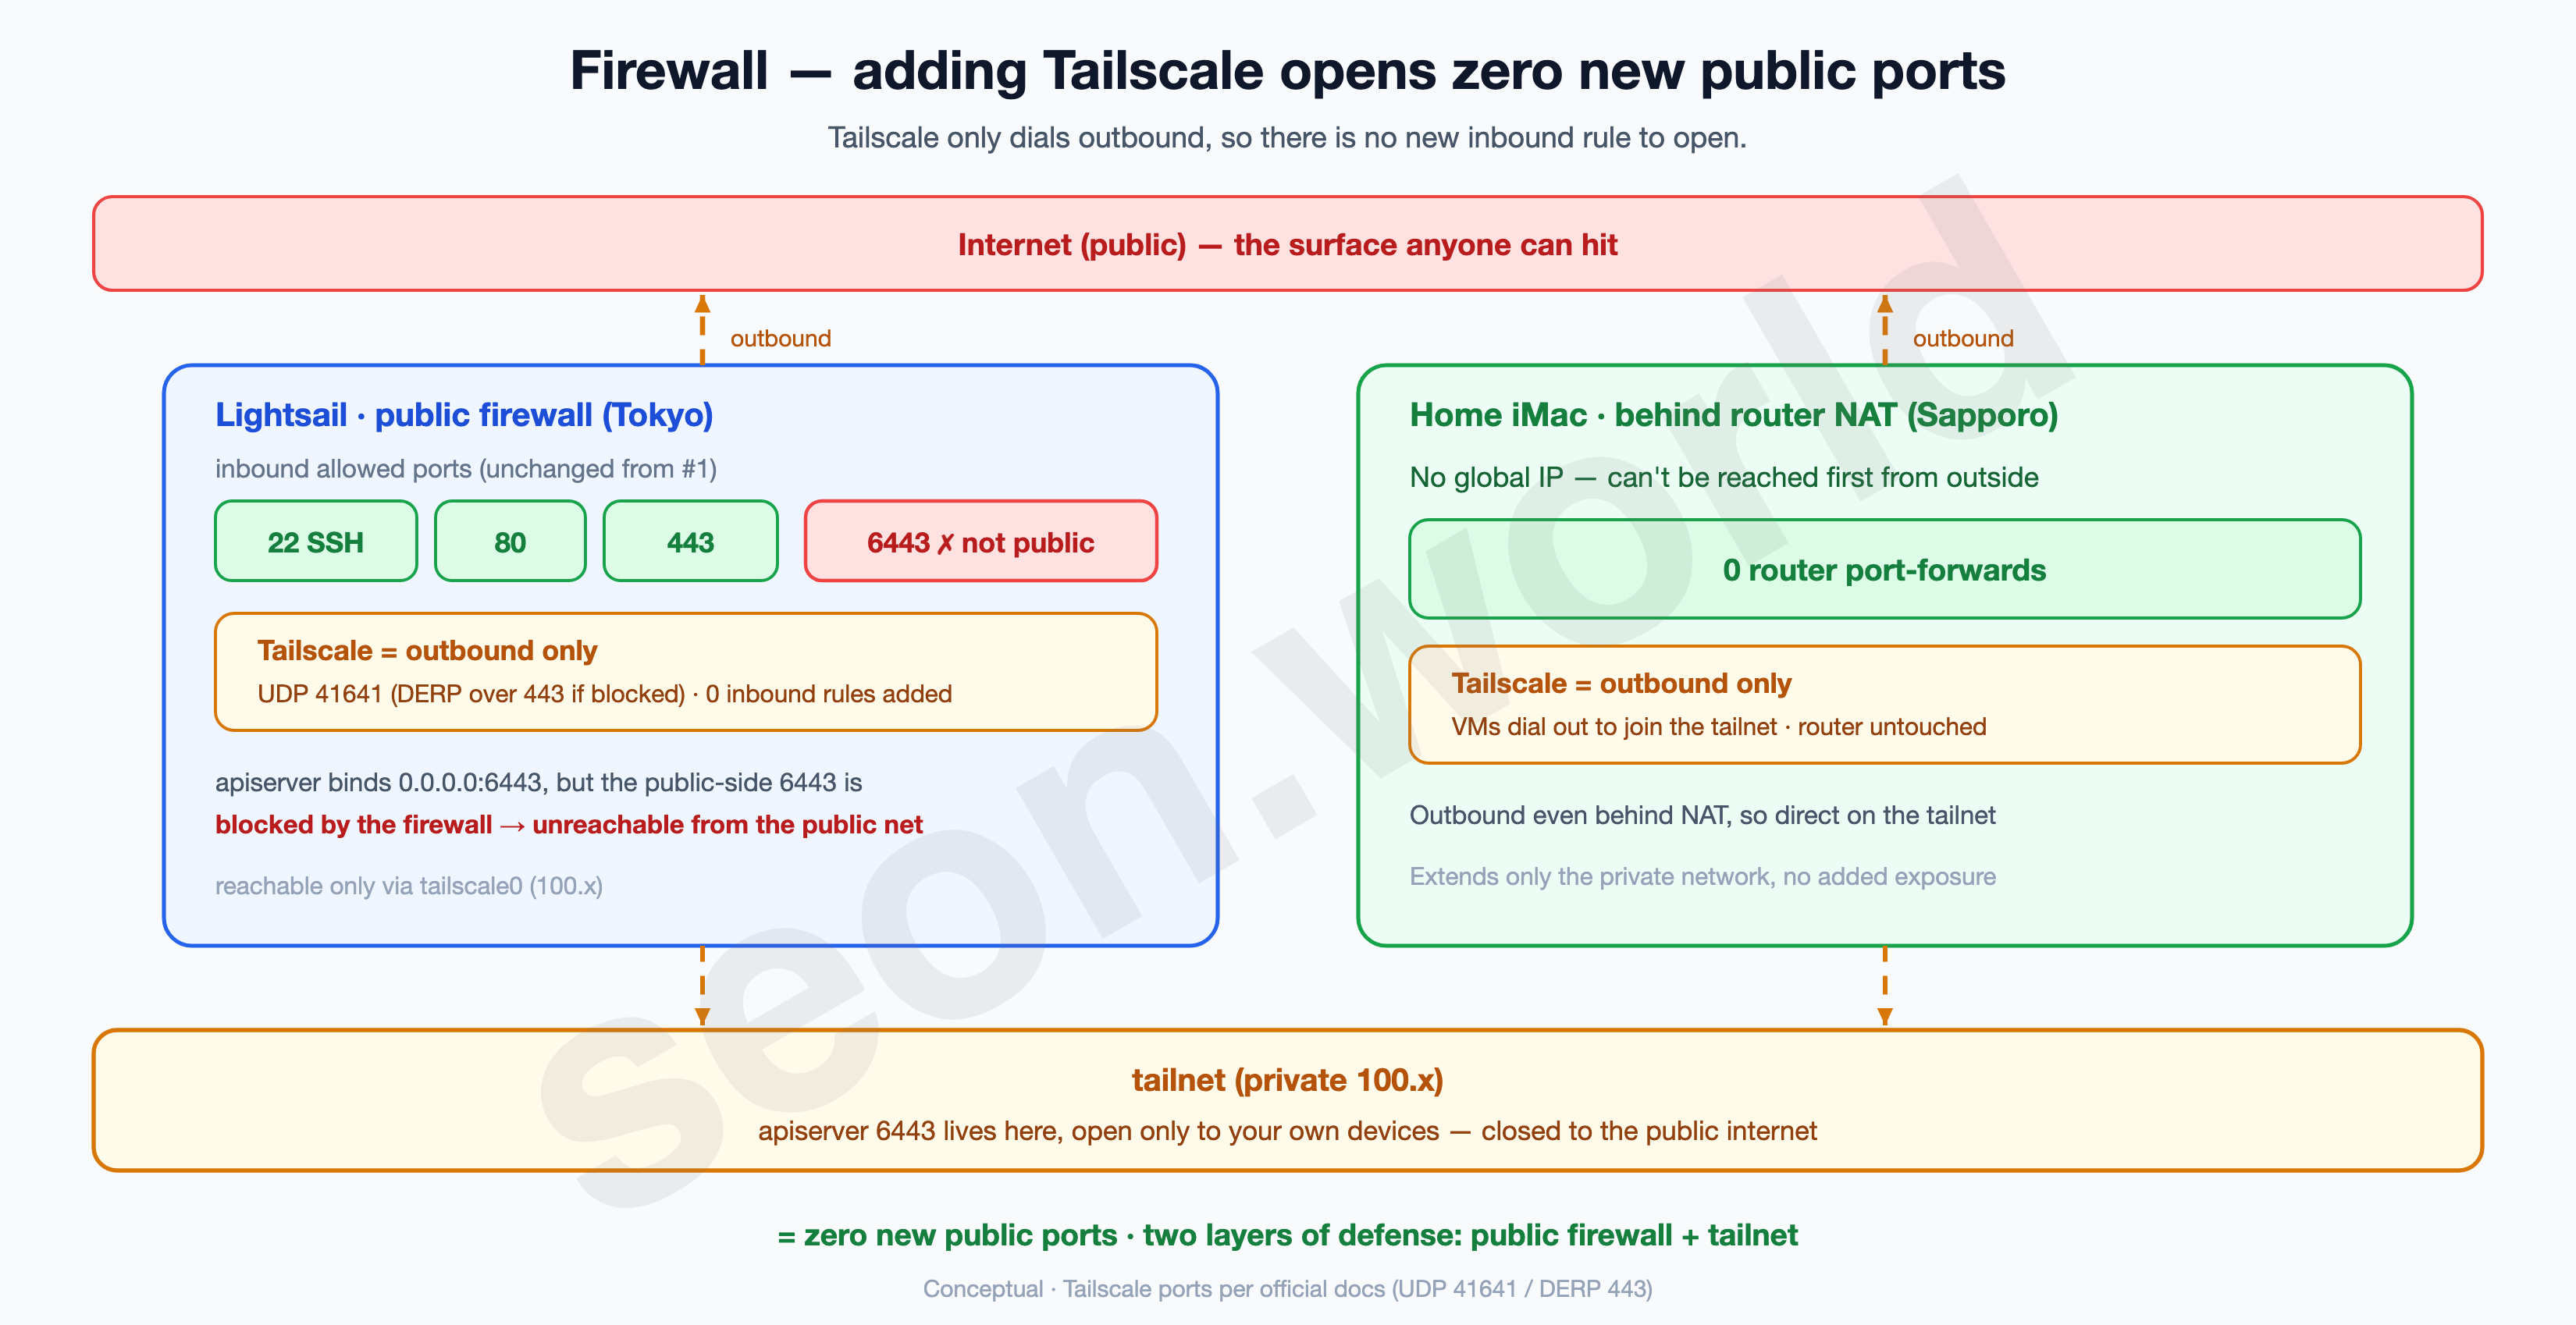
Tailscale only uses outbound connections (UDP 41641, or DERP over 443 if that’s blocked). So even with Tailscale on the VMs, the number of new inbound firewall ports to open is zero. It extends only the private network, without widening the exposed surface. The orthodox way is to keep cluster ports like the apiserver (6443) off the public net and reachable only inside the tailnet (the laptop’s connection goes over the tailnet too, in §7).
Note — “exactly zero public ports” is something I mean to finish in a later article. The apiserver (6443) can be closed on the public side the moment you switch to tailnet access. But closing inter-node Pod traffic (flannel VXLAN, UDP 8472) on the public net too needs extra config to run flannel over Tailscale (otherwise Pod-to-Pod traffic between nodes breaks — see the note in §6). That work and its limits (the overhead of double encapsulation, and so on) come later. What’s certain in this article is “Tailscale itself adds no exposure at all.”
Something I learned from running it: this is where a lot of time goes. Even within this article’s scope, you end up opening a port to get Pods talking to each other. And even with the port open, the limited speed and latency of the Tailscale overlay make it a real struggle. Solving it is the next article’s topic.
At this point six machines (2 cloud + 4 home) call each other by a fixed
100.xon one private network. They aren’t bound into a single cluster yet — in the next §6, that100.xgoes straight into the k3s agent join.
6. Agent join — putting the Tailscale 100.x straight into node-ip
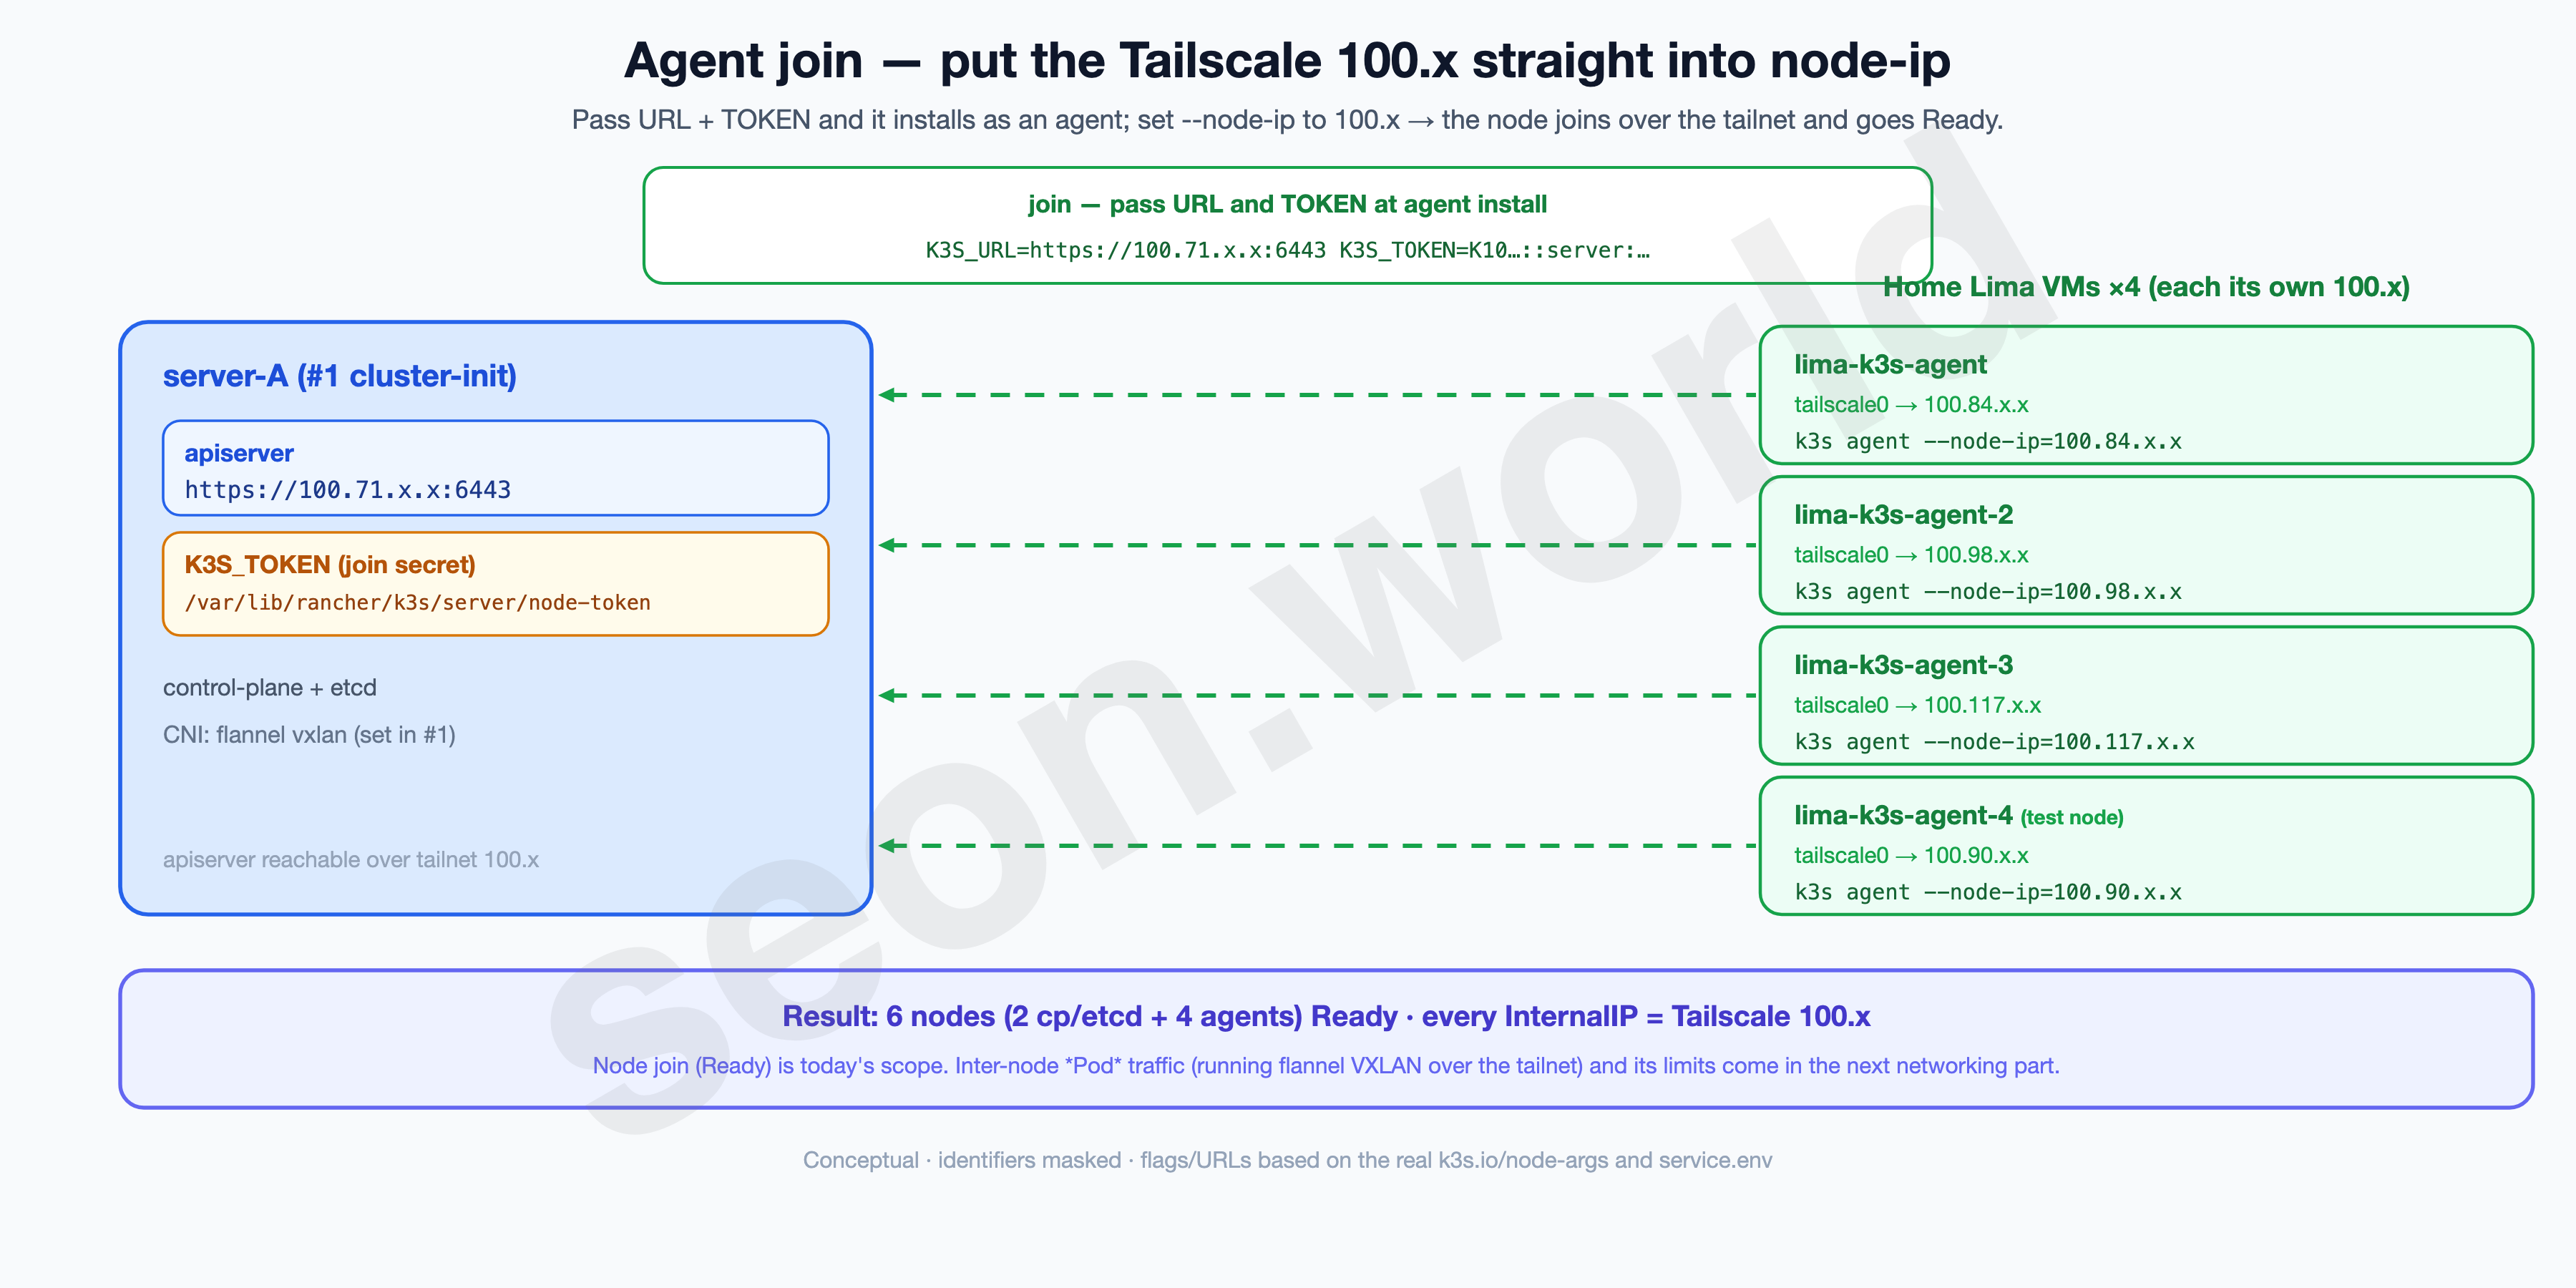
This is the article’s goal. The four VMs now on one tailnet join as agents to the cloud cluster stood up in #1.
The method is almost the same as #1’s server install. You pass the k3s install script two environment variables (K3S_URL, K3S_TOKEN) and the agent flags. The key is setting the address the node advertises itself on (--node-ip) to the Tailscale 100.x you got in §5. That gets the node to the apiserver over the tailnet and into the cluster.
6-1. Get the join token from the server
The token an agent uses to join lives on the server (#1’s cluster-init node).
sudo cat /var/lib/rancher/k3s/server/node-tokenK10<hash>::server:<random>Copy this value (the K3S_TOKEN below). The token’s location and meaning are laid out in the k3s token docs.
6-2. Join each VM as an agent
Run on each of the four VMs. K3S_URL is the server’s Tailscale address; --node-ip/--node-external-ip are that VM’s Tailscale 100.x.
curl -sfL https://get.k3s.io | INSTALL_K3S_VERSION=v1.34.3+k3s1 \
  K3S_URL=https://100.71.x.x:6443 \
  K3S_TOKEN=K10<hash>::server:<random> \
  sh -s - agent \
    --node-ip=<this VM's 100.x> \
    --node-external-ip=<this VM's 100.x>
Breaking down the flags:
K3S_URL=https://100.71.x.x:6443— the apiserver on the server (#1 cluster-init). It’s a Tailscale address, so it’s reachable inside the tailnet even with 6443 closed on the public net.K3S_TOKEN— the value from 6-1. With both URL and TOKEN present, the k3s install script installs as an agent, not a server.--node-ip=100.x/--node-external-ip=100.x— use the Tailscale address as this node’s InternalIP / externally advertised address.
Peek at a node that actually joined and you’ll see the same thing written there (real, token masked):
# /etc/systemd/system/k3s-agent.service
ExecStart=/usr/local/bin/k3s agent --node-external-ip=100.x.x.x --node-ip=100.x.x.x

# /etc/systemd/system/k3s-agent.service.env
K3S_URL='https://100.71.x.x:6443'
K3S_TOKEN=********
The flag meanings are in the k3s agent reference. The CNI carries over the flannel vxlan decided on the server in #1 as-is, and all six nodes are pinned to k3s version v1.34.3+k3s1 (confirmed in §7).
Note — this article goes only as far as “node join (Ready).” Inter-node Pod traffic is a later networking story. With just
--node-ip=100.x, a node reaches the apiserver over the tailnet and goesReady(which is this article’s goal: “the iMac joins as nodes”). But getting Pods on different nodes to talk requires flannel VXLAN to cross between nodes, and there’s a trap here.
- By default flannel advertises each node’s default-route interface IP as the VXLAN destination (public-ip). Cloud nodes have that as a VPC private network (e.g.,
172.26.x), home VMs as their own private network — so they sit on different underlays and may not reach each other directly.- So you need config to “run VXLAN over the tailnet (
100.x)” (like--flannel-iface=tailscale0), but you must not change just one side (the agents). Setting it on agents only makes them disagree with the server’s destination (VPC), and it breaks asymmetrically — traffic passes one way only. You have to align both server and agents (= touching #1’s server config too).- This — “putting flannel properly on the tailnet + the overhead and limits of double encapsulation (VXLAN over WireGuard) + the optimization” — is the next article’s topic. So this time I stop at nodes joining and going
Ready.
6-3. (optional) Automate it in lima.yaml
Instead of repeating by hand on four VMs, put the Tailscale install (§5) and the agent join above into the provisioning script of §4’s lima.yaml, and one limactl start carries it all the way to a finished node. The §2 promise of “one blueprint, four identical nodes” comes full circle here.
7. Verifying from the laptop — six nodes in one cluster
Following the orthodox approach, the apiserver (6443) isn’t open on the public net and is reached only inside the tailnet. So to check, the laptop joins the same tailnet and the kubeconfig is pointed at the server’s tailnet address. (The principle is the same whether the laptop is Mac, Windows, or Linux.)
7-1. Put the laptop on the tailnet (Mac / Windows / Linux)
Install the same Tailscale, on the same account, on the laptop too.
- macOS — the GUI app via
brew install --cask tailscale-app(or the App Store), then log in. - Windows — the installer from tailscale.com/download, then log in.
- Linux —
curl -fsSL https://tailscale.com/install.sh | sh→sudo tailscale up.
Once you log in, the laptop gets a 100.x and joins the same tailnet as the nodes. If tailscale status shows the cloud and home nodes, you’re ready.
Note — the Homebrew package names are confusing. The macOS GUI app (menu bar) is the cask
tailscale-app.brew install tailscale(the formula) installs only the CLI (tailscaled). To log in via the GUI on the laptop, usebrew install --cask tailscale-app.
7-2. Point kubeconfig at the tailnet address
The server’s (#1 cluster-init) kubeconfig is at /etc/rancher/k3s/k3s.yaml, with the server field defaulting to https://127.0.0.1:6443. Bring this file to the laptop (e.g., ~/.kube/config) and change server to the server’s Tailscale address.
kubectl config set-cluster default --server=https://100.71.x.x:6443Note — TLS won’t pass unless the cert SAN matches. Even after pointing
serverat the tailnet, if that100.xisn’t in the apiserver cert’s SAN you’ll be rejected withx509: certificate is valid for ... not .... When k3s brings up the server with--node-ip=100.x, it includes that address (the InternalIP) in the cert SAN automatically — peek at the cert and the100.xis there:X509v3 Subject Alternative Name: DNS:kubernetes, DNS:kubernetes.default, ..., IP Address:10.43.0.1, IP Address:100.71.x.x, IP Address:100.99.x.x, IP Address:127.0.0.1, ...If the
100.xisn’t in the SAN, add--tls-san=100.71.x.xon the server and re-issue the cert (k3s server docs).
7-3. Verify — kubectl get nodes
Check it straight from the laptop. The first things to check are whether all six are Ready, and whether the agents’ INTERNAL-IP is 100.x.
kubectl get nodes -o wideNAME STATUS ROLES AGE VERSION INTERNAL-IP OS-IMAGE CONTAINER-RUNTIME
ip-172-26-2-70… Ready control-plane,etcd 140d v1.34.3+k3s1 100.99.x.x Amazon Linux 2023 containerd://2.1.5-k3s1
ip-172-26-3-146… Ready control-plane,etcd 140d v1.34.3+k3s1 100.71.x.x Amazon Linux 2023 containerd://2.1.5-k3s1
lima-k3s-agent Ready <none> 140d v1.34.3+k3s1 100.84.x.x Ubuntu 24.04.3 LTS containerd://2.1.5-k3s1
lima-k3s-agent-2 Ready <none> 140d v1.34.3+k3s1 100.98.x.x Ubuntu 24.04.3 LTS containerd://2.1.5-k3s1
lima-k3s-agent-3 Ready <none> 140d v1.34.3+k3s1 100.117.x.x Ubuntu 24.04.3 LTS containerd://2.1.5-k3s1
lima-k3s-agent-4 Ready <none> 140d v1.34.3+k3s1 100.90.x.x Ubuntu 25.10 containerd://2.1.5-k3s1How to read it:
- The two cloud nodes are
control-plane,etcd(#1); the four home nodes areROLES <none>— agents, workload only. - Every node’s INTERNAL-IP is
100.x(Tailscale). That’s the sign the node joined over the tailnet. If a LAN IP like192.168.xshows up here, the node advertised itself wrong — so always check this column right after a join. - Version
v1.34.3+k3s1and runtimecontainerd://2.1.5-k3s1are the same across all six. Onlylima-k3s-agent-4has a different OS (Ubuntu 25.10, that test node from §4), but since the k3s version and runtime match, it’s no problem for joining.
Label the home nodes to tell them apart from the cloud (real):
kubectl get nodes -L node-type... ip-172-26-2-70 ... lightsail
... ip-172-26-3-146 ... lightsail
... lima-k3s-agent ... lima
... lima-k3s-agent-2 ... lima
... lima-k3s-agent-3 ... lima
... lima-k3s-agent-4 ... limaWhen I later route workloads to home/cloud, I use this node-type label in a nodeSelector (placement strategy in a later installment).
By the way, in the current operating state, with the networking finished, Pods are spread across the six nodes like this (this is how it runs now, after the improvements — not right after this step):
ip-172-26-2-70    68   (cloud)
ip-172-26-3-146   14   (cloud)
lima-k3s-agent    26   (home)
lima-k3s-agent-2  18   (home)
lima-k3s-agent-3  25   (home)
lima-k3s-agent-4  96   (home, the larger-app test node)
Pods running on both the cloud and home nodes — that’s what a hybrid cluster looks like.
With this, the home iMac became a worker in the cluster. Four empty Lima VMs → one private network with Tailscale → joined as k3s agents → 2 in Tokyo + 4 in Sapporo = all 6 nodes
Ready. The apiserver (6443) is seen only over the tailnet, by both the nodes and the laptop.
8. Cost — the increase was zero
The new cost this round is effectively zero. I added four nodes, but everything I used was either free or already on hand.
| Item | Cost (USD) |
|---|---|
| Lightsail server-A (8GB) | $44 / mo (unchanged from #1) |
| Lightsail server-B (16GB) | $84 / mo (unchanged from #1) |
| k3s / Lima | $0 (open source) |
| Tailscale Personal | $0 |
| Home nodes (Lima VM ×4, iMac) | $0 (iMac I already had) |
| This round’s increase | +$0 |
One at a time:
- Cloud — the same two Lightsail boxes from #1. Instances added this round: zero → cloud increase $0.
- k3s · Lima — both open source. Adding nodes costs no license fee.
- Tailscale — the personal plan is free. Six nodes + a laptop is nowhere near the free-tier limit → $0.
- Home nodes — reused the idle iMac → zero new purchase.
Note — I’m deliberately leaving electricity out as a number. The iMac runs 24/7, so power really does cost something. But that cost swings widely by region (Sapporo, Tokyo, and each reader’s own country), contract plan, and season/usage — so putting one dollar figure on it would be wrong for most readers. So I don’t quantify it — measuring your own draw (W) with a smart plug is the most accurate. The point is that the cloud and software increase is zero, and the only real added cost is “electricity for a machine I already own.”
9. Glossary — what came up this time
A quick sweep of the terms.
- Lima /
limactl— an open-source tool for standing up headless Linux VMs on macOS from declarative YAML.limactlis its CLI. - vz (Apple Virtualization.framework) — macOS’s built-in hypervisor. Lima’s default on 13.5+. If
systemd-detect-virtreadsapplein the guest, it’s on vz. - Guest VM vs container — a VM has its own kernel and strong isolation; a container shares the host kernel and has weak isolation. That’s why this article chose VMs for “real nodes.”
- k3s server / agent — a server is the control plane (+etcd); an agent is a workload-only node. Pass
K3S_URL+K3S_TOKENat install and it joins as an agent. - tailnet /
100.x— the private mesh network Tailscale builds. Each device gets a fixed address in the100.64.0.0/10(CGNAT) range. - WireGuard / DERP — WireGuard is Tailscale’s VPN engine; when a direct path isn’t possible, it detours through a DERP relay.
- auth key (Reusable) — a key for joining the tailnet non-interactively, without a browser. Reusable across multiple nodes.
- flannel / VXLAN — flannel is k3s’s default CNI, VXLAN its default backend. It carries inter-node Pod packets encapsulated in UDP (8472).
--node-ip/ InternalIP — the address a node advertises to the cluster. Put a Tailscale100.xhere and the node joins over the tailnet (putting Pod-to-Pod traffic on the tailnet is separate config — next time).- node-token — the secret an agent uses to join. On the server at
/var/lib/rancher/k3s/server/node-token. node-typelabel / nodeSelector — a label on the nodes (here, lima/lightsail). Used later in anodeSelectorto route workloads to home/cloud.
10. Next
With six nodes in place, the next thing is what to put on top of them.
At first I got carried away and threw all kinds of things on — and the traffic wouldn’t go through. I ended up ignoring the principle and opening port 8472 (udp / flannel VXLAN) to make communication work, and ran it that way. But the real trouble started once I brought in Longhorn and CNPG: latency on inter-node traffic set off a cascade of errors, with pods restarting over and over, and countless rounds of trial and error.
That’s what I want to get into next time.
Thanks for reading all the way through.